| .vscode | ||
| documentation | ||
| schematic | ||
| sdCard_content | ||
| src | ||
| .gitignore | ||
| gitea_ci.json | ||
| LICENSE.md | ||
| README.md | ||
ESP8266_swiss_army_board
I created this platform based on the cheap esp8266 as a development tool in order to write connected embedded applications in C/C++.
My goal is to try to create stable and optimized modules and services from scratch like web servers, ftp servers, schedulers and others for fun as well as for a training purpose.
This project is still under development (when I have time).
Feel free to reuse parts or the whole code if you want.
Check the license file at the root of the repository : LICENSE.md for more information.
The hardware :
The board :

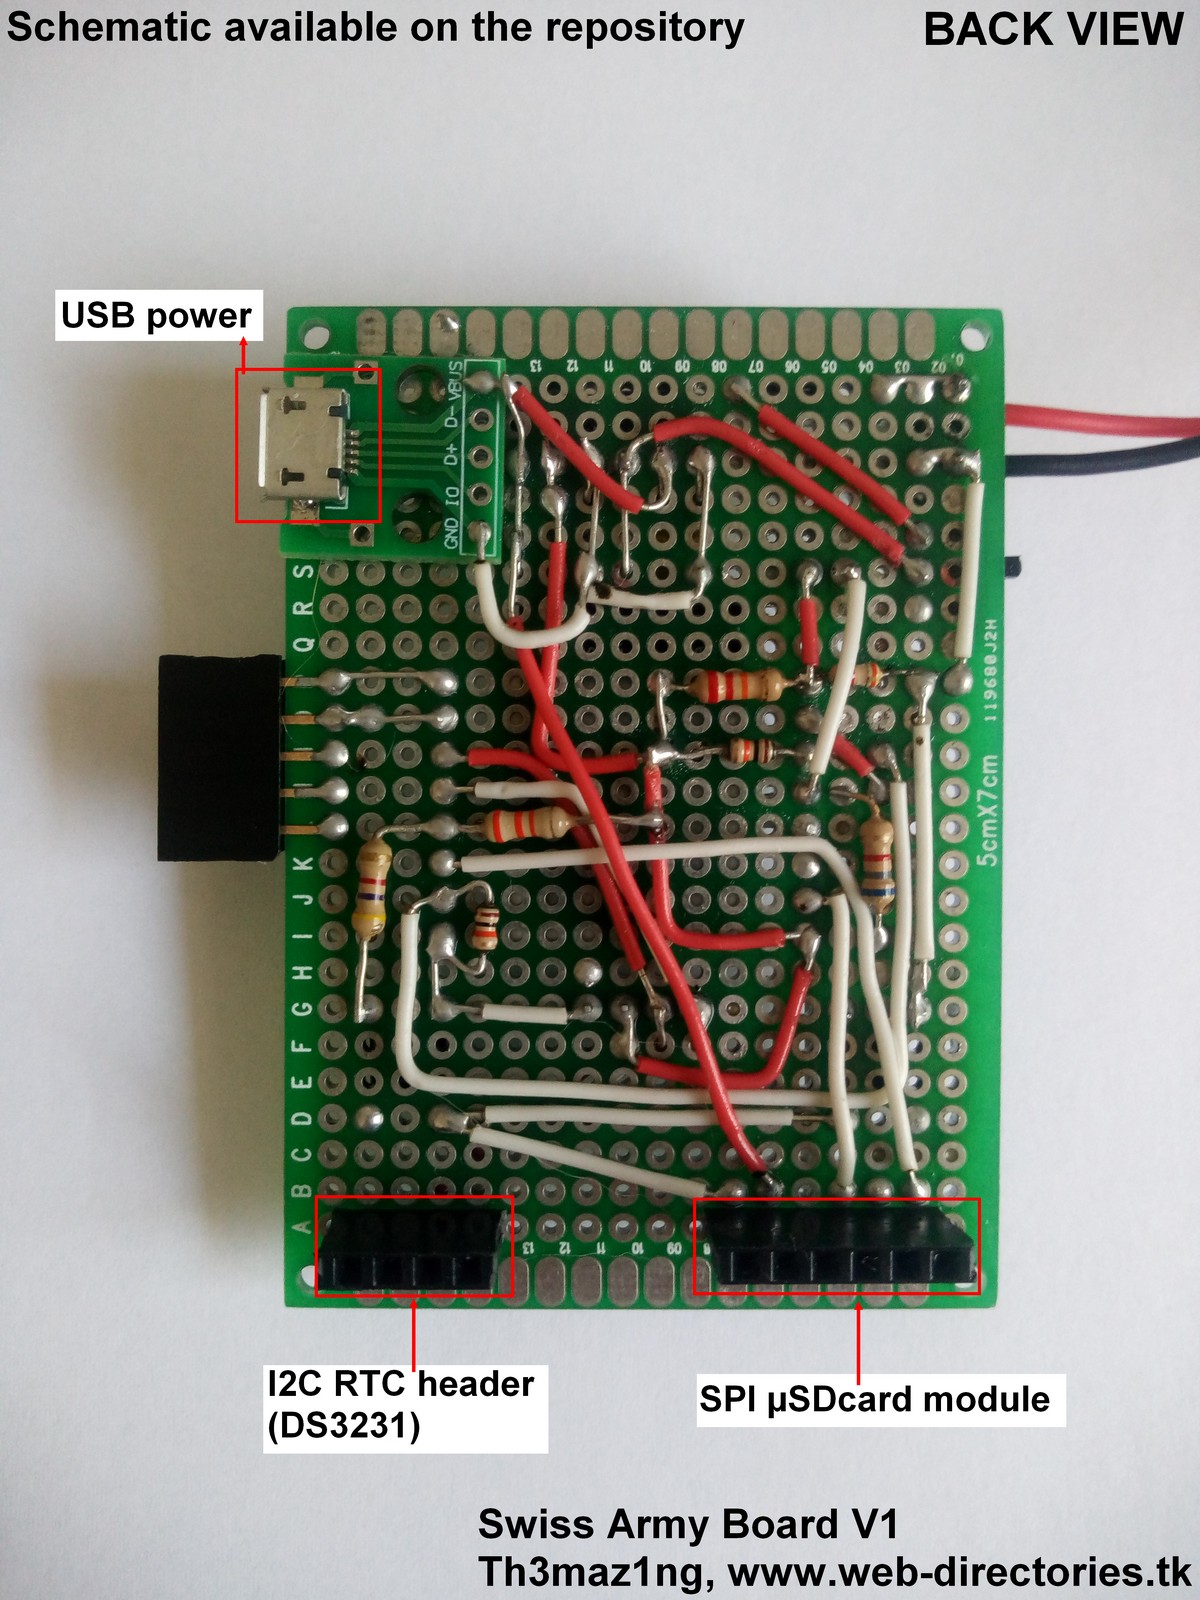
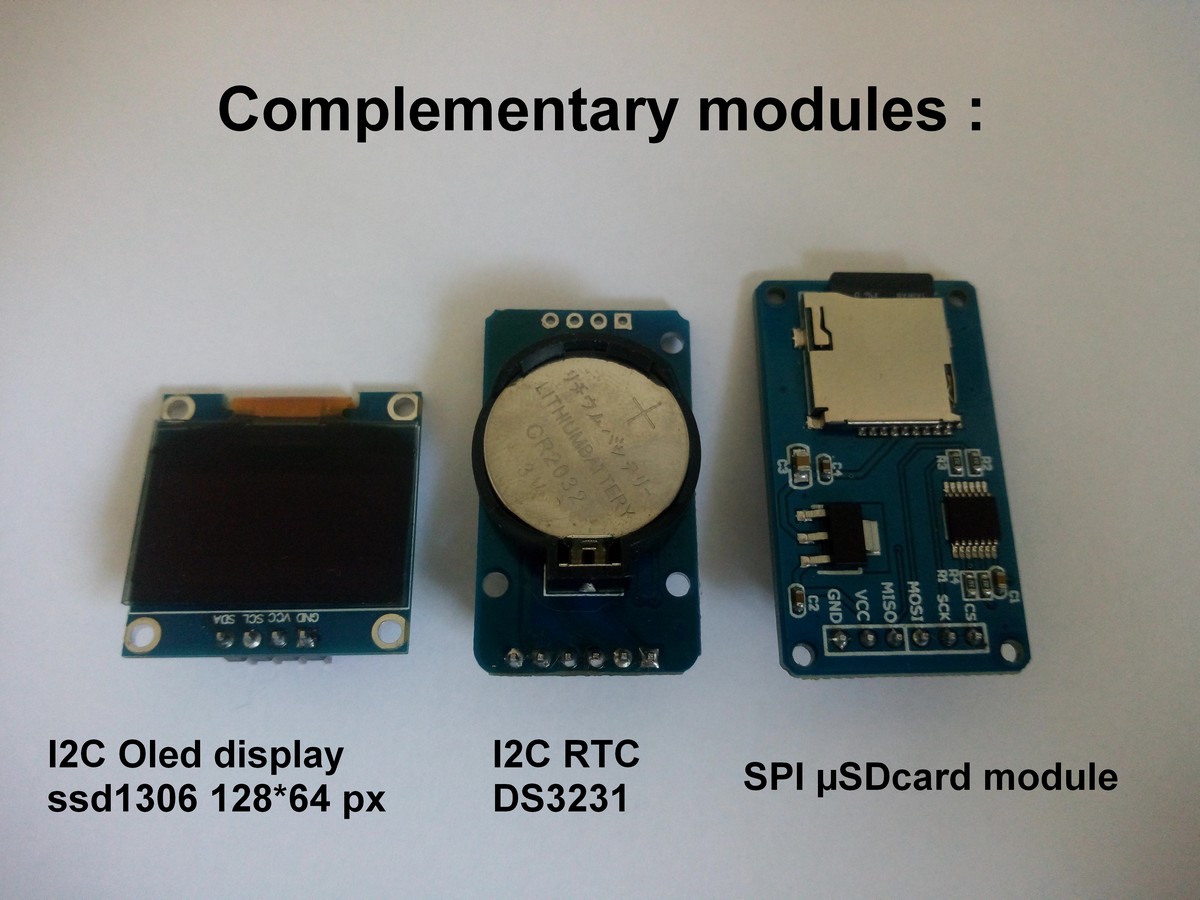
The modules :
Hardware pin mapping :
 (This image wasn't done by me)
So we have :
- I2C (for OLED screen and RTC)
- GPIO4 --> SDA
- GPIO5 --> SCL
- SPI (for µSDCard)
- GPIO13 --> MOSI
- GPIO12 --> MISO
- GPIO14 --> CLK
- GPIO2 --> µSDCard CHIP_SELECT
- FLASH_BTN
- GPIO 0
Here is a list of the components needed in order to build such a board :
- 1x 1N4001 reverse voltage protection diode
- 1x AMS1117 5v voltage regulator
- 1x AMS1117 3.3v voltage regulator
- 2x 22µf electrolytic capacitors
- 2x 0.1µf (code 104) tantalum capacitors
- 1x jumper
- 1x 2 pins male header
- 1x On/Off switch
- 2x push buttons
- 1x ESP8266 E12
- 1x 19 pins female header
- 1x 2 screws terminal
- 1x micro USB socket
- 1x 100 ohm resistor
- 2x 1k ohm resistor
- 1x 6.8k ohm resistor
- 1x 3.9k ohm resistor
- 1x 22k ohm resistor
- 2x 10k ohm resistor
- 1x 33k ohm resistor
- 1x 4.7k ohm resistor
- 1x 7cmx5cm pcb
The software :
This code was tested against version 3.0.2 of the ESP8266 core SDK. Use this version if it does not compile.
Default FLASH Options (for the Arduino IDE) :

 For OTA updates to work properly, do not use V2 lower memory LwIP Variant, use the V2 lower memory (no features) LwIP Variant instead !
I2C Hardware addresses :
- OLED screen : 0x3C
- RTC DS3231 : 0x68
- PCF8574 : 0x27
External librairies used :
- Adafruit_SSD1306 (not my work) link
- Adafruit-GFX (not my work) link
- RTClib-master (not my work) link
- AT24CXX-master (not my work) link
- WebSockets (not my work) link
/!\ Some of these librairies have been modified for the project, thus, it is recommended to get them from the repository here : link
SD Card structure (subject to changes) :
/
|_CONFIG
| \_ AP.CFG
| |_SCREEN.CFG
| |_SERVER.CFG
| |_STA.CFG
|_FTP
|_LOGS
|_WWW
  \_rsrc
  |_index.htm
  |_indexV2.htm
Example of a config file structure (.CFG) :
#This line is a comment and will be ignored
#All comments should be at the top of the file
#The parameter names are case sensitive /!\

this_is_the_parameter_name : this_is_a_numeric_value
'this is the parameter name' : this_is_a_numeric_value
this_is_the_parameter_name : 'this is a string value'
'this is the parameter name' : 'this_is_a_string_value'
For AP.CFG it would be :
#This config file stores the configuration needed to set the AP
#up for the ESP8266SwissArmyBoad
#If this file is not present or if there is an error at parsing time
#default values will be used instead.
#If the password is an empty string aka '', the network will be open

SSID : 'ESP8266SwissArmyBoard'
PASSWORD : 'APassWord'
CHANNEL : 1
SSID_HIDDEN : 'true'
AP_MAX_CONNECTION : 4
For STA.CFG it would be :
#This config file stores the configuration needed to connect the board
#to a wifi hotspot
#If this file is not present or if there is an error at parsing time
#only the AP functionality will be enabled

SSID : 'MyHotspotSSID'
PASSWORD : 'MySuperSecuredPassword'
System WEB api :
Here is a list of the available api calls for the board :
-
/sab/web/apitester
- HTTP request method : ALL
- Description : Test if the api system is available
- Response format : JSON
- OK : { "status" : "ok", "API" : "available" }
- FAIL : NOTHING
-
/sab/view/next
- HTTP request method : GET
- Description : Display the next view on the screen
- Response format : JSON
- OK : { "status" : "ok", "ViewUID" : "UID" }
- FAIL : { "status" : "failed", "message" : "REASON" }
-
/sab/view?UID=x
- HTTP request method : GET
- Description : Display the view with the corresponding id
- Response format : JSON
- OK : { "status" : "ok", "ViewUID" : "UID" }
- FAIL : { "status" : "failed", "message" : "REASON" }
-
/sab/rtc/get/datetime
- HTTP request method : GET
- Description : Get RTC's time
- Response format : JSON
- OK : { "status" : "ok", "date" : "xx/xx/xxxx", "time" "xx:xx:xx" }
-
/sab/rtc/set/datetime?datetime=day_month_year_hours_minutes_seconds
- HTTP request method : GET
- Description : Set RTC's clock
- Response format : JSON
- OK : { "status" : "ok", "date" : "xx/xx/xxxx", "time" "xx:xx:xx" }
- FAIL : { "status" : "failed", "message" : "REASON" }
-
/sab/sdcard/size
- HTTP request method : GET
- Description : Show SD Card size in GByte
- Response format : JSON
- OK : { "status" : "ok", "card" : "present", "size" : "xx.xx", "unit" : "GByte" }
- OK : { "status" : "ok", "card" : "not present", "size" : "0" }
-
/sab/sdcard/action?action=mount or unmount
- HTTP request method : GET
- Description : Mounts or Unmounts the SD Card in order to remove it
- Response format : JSON
- OK : { "status" : "ok", "card" : "mounted" } or { "status" : "ok", "card" : "unmounted" }
- ERROR : { "status" : "error", "message" : "begin failed" } or
-
/esp/restart
- HTTP request method : GET
- Description : Restart the UC, this one is recommended compared to the reset call
- Response format : JSON
- OK : { "status" : "ok", "message" : "module restarting in 10 seconds" }
-
/esp/reset
- HTTP request method : GET
- Description : Reset the UC
- Response format : JSON
- OK : { "status" : "ok", "message" : "module resetting in 10 seconds" }
-
/sab/wifi/stainfo
- HTTP request method : GET
- Description : Get the module's station information
- Response format : JSON
- OK : { "status" : "ok", "RSSI" : "-XX", "RSSI2" : "X", "local IP" : "XXX.XXX.X.XX", "mac" : "XX:XX:XX:XX:XX:XX" }
-
/sab/wifi/scanner
- HTTP request method : GET
- Description : Starts a scan of nearby WiFi access points and returns an array with information about them
- Response format : JSON
- OK : [ { "SSID" : "ssid_1", "RSSI" : -67, "Protected" : "Yes" }, { "SSID" : "ssid_2", "RSSI" : -42, "Protected" : "No" } ]
-
/sab/systeminfo
- HTTP request method : GET
- Description : Get the module's system information (free memory, heap frag etc...)
- Response format : JSON
- OK : { "status" : "ok", "CPU freq" : "XX", "free RAM" : "XXXXX", "heap frag" : "X", "max block" : "XXXXX", "nb views" : "X" }
-
/sab/power/info
- HTTP request method : GET
- Description : Get the module's power information
- Response format : JSON
- OK : { "status" : "ok", "power type" : "USB", "level" : "0", "unit" : "%" }
-
/sab/io/get/level
-
/sab/io/get/level?P0&P2&PX...
- HTTP request method : GET
- Description : Get the module's I/O logic levels, it is possible to check the level of specific pins
- Response format : JSON
- OK : { "status" : "ok", "P0" : "1", "P1" : "1", "P2" : "0", "P3" : "1", "P4" : "1", "P5" : "1", "P6" : "1", "P7" : "1" }
-
/sab/io/set/level?P0=0&P2=1&PX=X...
- HTTP request method : GET
- Description : Set the module's I/O logic levels, it is possible to set the level for specific pins
- Response format : JSON
- OK : { "status" : "ok", "P0" : "0", "P1" : "1", "P2" : "1", "P3" : "1", "P4" : "1", "P5" : "0", "P6" : "1", "P7" : "1" }
-
/sab/io/get/mode
-
/sab/io/get/mode?P0&P2&PX...
- HTTP request method : GET
- Descritpion : Get the module's I/O mode (ie input or ouput), it is possible to get the mode of specific pins
- Response format : JSON
- OK : { "status" : "ok", "P0" : "OUT", "P1" : "IN", "P2" : "OUT", "P3" : "OUT", "P4" : "IN", "P5" : "OUT", "P6" : "IN", "P7" : "OUT" }
-
/sab/io/set/mode?P0=IN&P1=OUT&PX=X...
- HTTP request method : GET
- Description : Set the module's I/O mode (ie input or ouput), it is possible to set the mode for specific pins
- Response format : JSON
- OK : { "status" : "ok", "P0" : "IN", "P1" : "OU", "P2" : "OUT", "P3" : "OUT", "P4" : "IN", "P5" : "OUT", "P6" : "IN", "P7" : "OUT" }
-
/sab/ota/update/device
- HTTP request method : GET
- Description : Check if an OTA update is available, if yes fetch the version
- Response format : JSON
- OK : {"status":"ok","ota":"disabled"}
- OK : {"status":"ok","ota":"enabled","msg":"Update available","version":"X.X.X"}
- OK : {"status":"ok","ota":"enabled","msg":"No update available"}
- ERROR : {"status":"error","ota":"enabled","msg":"OTA reach error"}
- ERROR : {"status":"error","ota":"enabled","msg":"Undefined error"}
-
/sab/ota/update/device?update
- HTTP request method : GET
- Description : Check if an OTA update is available, if yes, applies the update
- Response format : JSON
- OK : {"status":"ok","ota":"enabled","msg":"Updating the device, please wait","version":"X.X.X"}
- OK : {"status":"ok","ota":"disabled"}
- OK : {"status":"ok","ota":"enabled","msg":"No update available"}
- ERROR : {"status":"error","ota":"enabled","msg":"OTA reach error"}
- ERROR : {"status":"error","ota":"enabled","msg":"Undefined error"}
Things to do :
- Screen Manager
- Add an auto power off function ✓
- µSDcard File System
- Add a file truncate function
- File Config Parser
- Add save config
- Templated Dictionary Class
- RTC Manager
- RTC FLASH Manager
- FTP Server
- Passive mode
- Active mode (needs to be done)
- WEBServer (previously WEB ServerManager) ✓
- WEBServer handling multiple clients simultaneously ✓
- Fixed a nasty stack overflow - WEBServer class is now stable ✓
- Added partial content request support ✓
- Cookie support added, server can set and retrieve cookies ✓
- User can send custom HTTP Headers ✓
- WEBSocket Server for the dashboard
- GPIO Util ✓
- Dictionary class needs to be correctly rewritten.
- Task Scheduler Manager (in progress - almost done)
- SDCard log class (for logging events with a timestamp in a file)
- Writing a proper documentation and wiki pages for the board
- MySQL Client class (for inserting/removing/updating & fetching data)
Known issues :
IP stack stops responding after about 24 hours of continuous requests. No MCU crashes.Fixed :)The multi-client WEBServer is crashing in a non reproducible manner (esp8266 stack trace + reset)Fixed :)